Resource Adoption
There are times that you might want to use KubeVela application to adopt existing resources or from other sources like Helm release. In this case, you can leverage the capability of resource adoption in KubeVela.
Use in Application
By default, when KubeVela application tries to dispatch (create or update) one resource, it will first check if this resource belongs to itself. This check is done by comparing the label values of app.oam.dev/name & app.oam.dev/namespace and see whether they are equal to the application's name & namespace.
If this resource does not belongs to the application itself (belongs to no one or some other application), the application will stop the dispatch operation and report an error. This mechanism is designed to prevent unintended edits to resources managed by other operators or systems.
If the resource is currently managed by other applications, you can refer to shared-resource policy and read more about sharing resources across multiple applications.
If the resource is managed by no one, to allow KubeVela application to manage the resource, you can leverage the read-only policy or take-over policy to enforce resource adoption on these resources.
ReadOnly Policy
With read-only policy, you can select resources that could be adopted by the current application. For example, in the below application, Deployment typed resources are treated as read-only resources and are able to be adopted by the given application.
apiVersion: core.oam.dev/v1beta1
kind: Application
metadata:
  name: read-only
spec:
  components:
    - name: nginx
      type: webservice
      properties:
        image: nginx
  policies:
    - type: read-only
      name: read-only
      properties:
        rules:
          - selector:
              resourceTypes: ["Deployment"]
The read-only policy allows application to read the selected resources but will skip all edits to the target resource. Error will be reported if the target resource does not exist.
The target resource will NOT be attached with the application's label. It is possible for multiple applications to use the same resource with read-only policy concurrently. The deletion of the application will also skip the recycle process of the target resources.
Although the resources selected in the read-only policy will not be editable through application, both health check and resource topology graph can work normally. Therefore, you can use KubeVela application with read-only policy to build "monitoring group" for underlying resources and leverage tools such as vela top or velaux to observe them, without any modification.
practice
- First create the nginx deployment.
kubectl create deploy nginx --image=nginx
- Deploy the application with
read-onlypolicy.
cat <<EOF | vela up -f -
apiVersion: core.oam.dev/v1beta1
kind: Application
metadata:
  name: read-only
spec:
  components:
    - name: nginx
      type: webservice
      properties:
        image: nginx
  policies:
    - type: read-only
      name: read-only
      properties:
        rules:
          - selector:
              resourceTypes: ["Deployment"]
EOF
- Check the running status of the application.
vela status read-only
Use
vela topto see the resource topology of the application.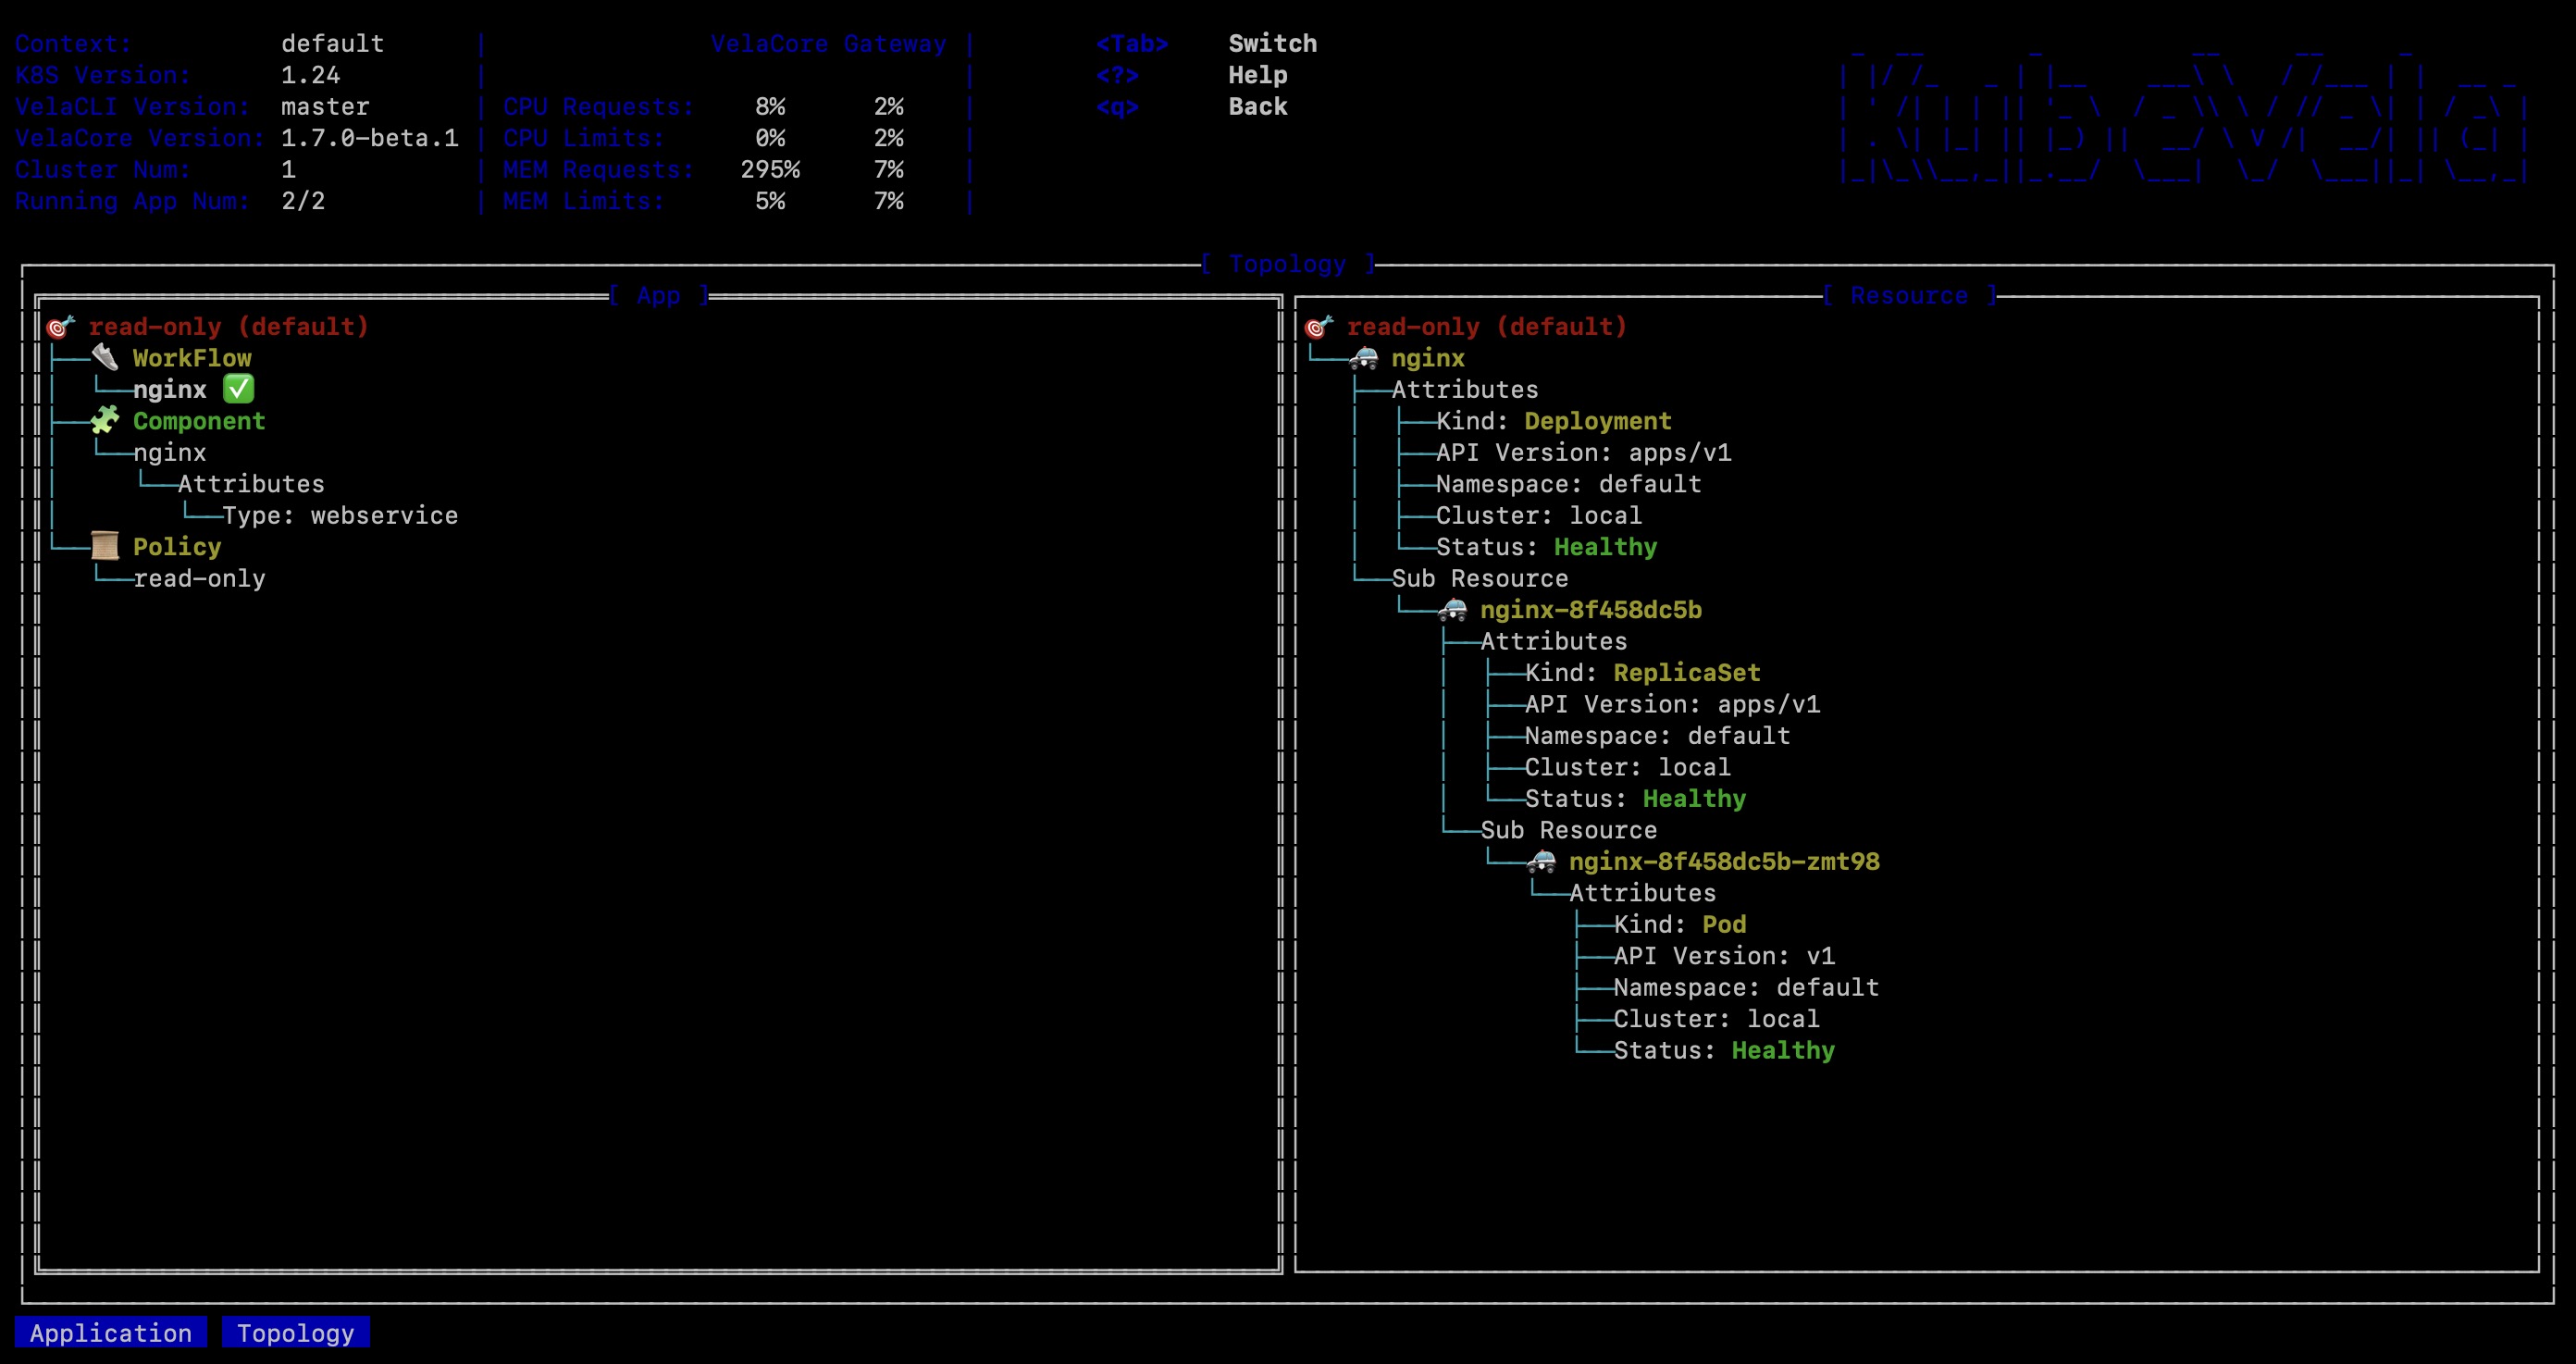
Use
velauxto see the resource topology graph of the application.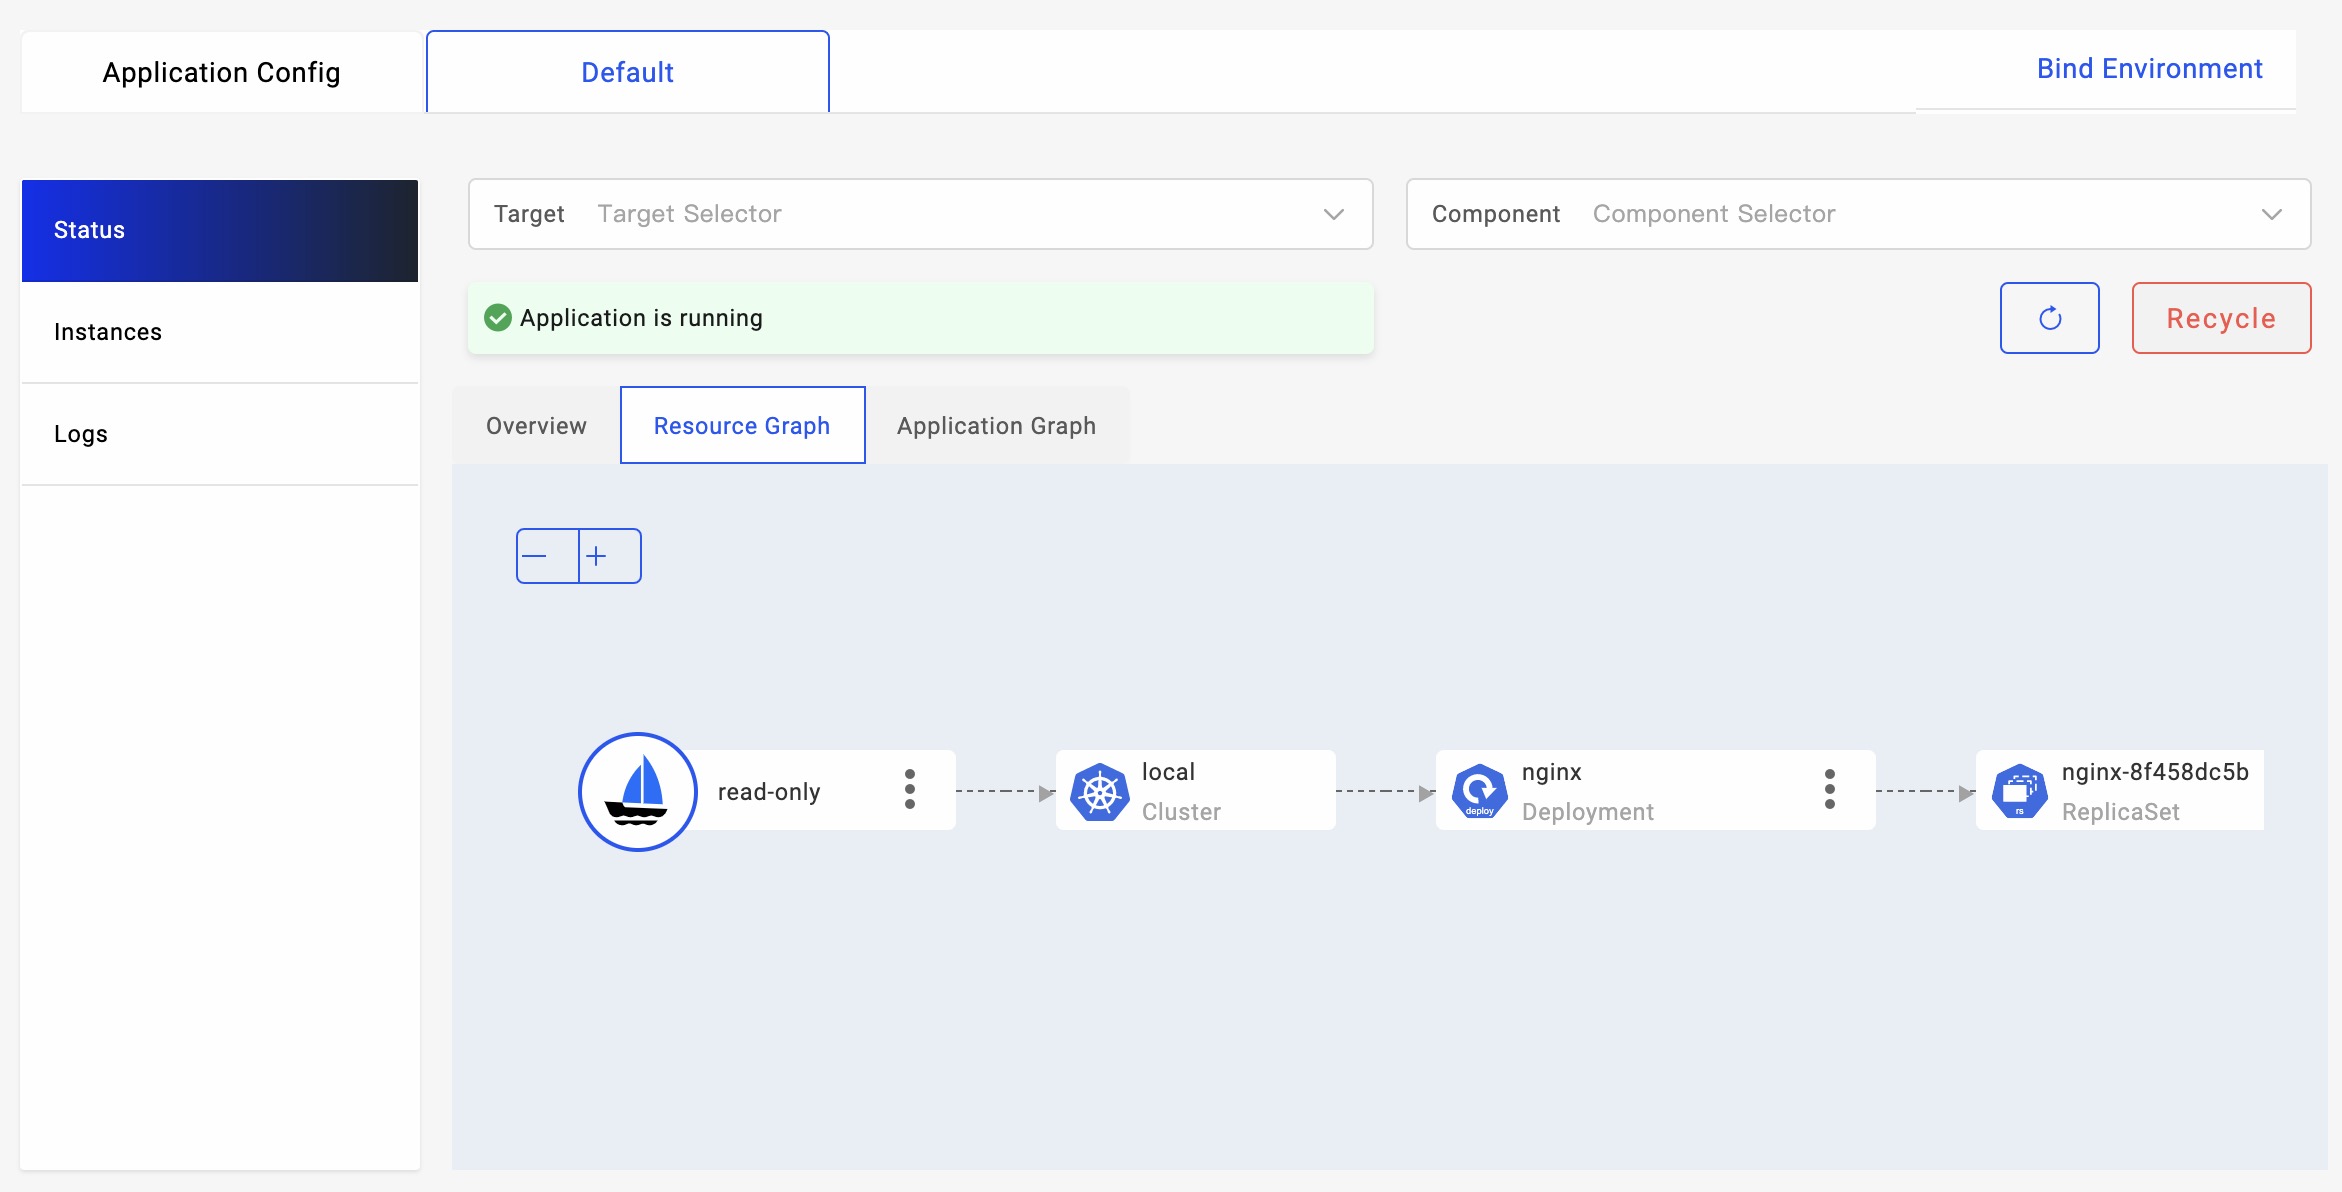
TakeOver Policy
In the case you not only want KubeVela application to observe underlying resource but also want the application to be able to edit them, you can use the take-over policy in replace of the read-only policy.
apiVersion: core.oam.dev/v1beta1
kind: Application
metadata:
  name: take-over
spec:
  components:
    - name: nginx-take-over
      type: k8s-objects
      properties:
        objects:
          - apiVersion: apps/v1
            kind: Deployment
            metadata:
              name: nginx
      traits:
        - type: scaler
          properties:
            replicas: 3
  policies:
    - type: take-over
      name: take-over
      properties:
        rules:
          - selector:
              resourceTypes: ["Deployment"]
In the above application, the nginx deployment will be added with owner labels and marked as belonged to the current app. The attached scaler trait in the application will modify the replica number of the target deployment to 3, while keeping all other fields untouched.
After the resource is taken over by the application, the application will control the upgrades and deletion of the target resource. Therefore, differ from read-only policy, each resource can only be managed by one application with take-over policy.
The take-over policy is helpful when you want to let the application to take the complete control for the given resources.
practice
- First create the nginx deployment
kubectl create deploy nginx --image=nginx
- Deploy the application with
take-overpolicy.
cat <<EOF | vela up -f -
apiVersion: core.oam.dev/v1beta1
kind: Application
metadata:
  name: take-over
spec:
  components:
    - name: nginx-take-over
      type: k8s-objects
      properties:
        objects:
          - apiVersion: apps/v1
            kind: Deployment
            metadata:
              name: nginx
      traits:
        - type: scaler
          properties:
            replicas: 3
  policies:
    - type: take-over
      name: take-over
      properties:
        rules:
          - selector:
              resourceTypes: ["Deployment"]
EOF
- Check the application running status.
vela status take-over
Use in CLI
The read-only policy and take-over policy provide a way for users to directly adopt resources within KubeVela application api. If you prefer directly build KubeVela application by existing resources from scratch, you can use the vela adopt CLI command.
Adopt Native Resource
By providing a list of native Kubernetes resources, vela adopt command can help you automatically adopt those resources in an application. You can follow the below procedure to try it out.
- Create some resources for adoption.
kubectl create deploy example --image=nginx
kubectl create service clusterip example --tcp=80:80
kubectl create configmap example
kubectl create secret generic example
- Run
vela adoptcommand to create an application that contains all the resource mentioned above.
vela adopt deployment/example service/example configmap/example secret/example
expected output
apiVersion: core.oam.dev/v1beta1
kind: Application
metadata:
  creationTimestamp: null
  labels:
    app.oam.dev/adopt: native
  name: example
  namespace: default
spec:
  components:
  - name: example.Deployment.example
    properties:
      objects:
      - apiVersion: apps/v1
        kind: Deployment
        metadata:
          name: example
          namespace: default
        spec:
          progressDeadlineSeconds: 600
          replicas: 1
          revisionHistoryLimit: 10
          selector:
            matchLabels:
              app: example
          strategy:
            rollingUpdate:
              maxSurge: 25%
              maxUnavailable: 25%
            type: RollingUpdate
          template:
            metadata:
              creationTimestamp: null
              labels:
                app: example
            spec:
              containers:
              - image: nginx
                imagePullPolicy: Always
                name: nginx
                resources: {}
                terminationMessagePath: /dev/termination-log
                terminationMessagePolicy: File
              dnsPolicy: ClusterFirst
              restartPolicy: Always
              schedulerName: default-scheduler
              securityContext: {}
              terminationGracePeriodSeconds: 30
    type: k8s-objects
  - name: example.Service.example
    properties:
      objects:
      - apiVersion: v1
        kind: Service
        metadata:
          name: example
          namespace: default
        spec:
          clusterIP: 10.43.65.46
          clusterIPs:
          - 10.43.65.46
          internalTrafficPolicy: Cluster
          ipFamilies:
          - IPv4
          ipFamilyPolicy: SingleStack
          ports:
          - name: 80-80
            port: 80
            protocol: TCP
            targetPort: 80
          selector:
            app: example
          sessionAffinity: None
          type: ClusterIP
    type: k8s-objects
  - name: example.config
    properties:
      objects:
      - apiVersion: v1
        kind: ConfigMap
        metadata:
          name: example
          namespace: default
      - apiVersion: v1
        kind: Secret
        metadata:
          name: example
          namespace: default
    type: k8s-objects
  policies:
  - name: read-only
    properties:
      rules:
      - selector:
          componentNames:
          - example.Deployment.example
          - example.Service.example
          - example.config
    type: read-only
status: {}
By default, the application first embeds all the given resources in its components. Then it attaches the read-only policy. You can edit the returned configuration and make your own adoption application. Or you can directly apply this application with the --apply arg.
vela adopt deployment/example service/example configmap/example secret/example --apply
You can also set the application name you would like to use.
vela adopt deployment/example service/example configmap/example secret/example --apply --app-name=adopt-example
Now if you can use vela status and vela status -t -d command show the status the applied application.
vela status adopt-example
expected output
About:

  Name:         adopt-example
  Namespace:    default
  Created at:   2023-01-11 14:21:21 +0800 CST
  Status:       running

Workflow:

  mode: DAG-DAG
  finished: true
  Suspend: false
  Terminated: false
  Steps
  - id: 8d8capzw7e
    name: adopt-example.Deployment.example
    type: apply-component
    phase: succeeded
  - id: 6u6c6ai1gu
    name: adopt-example.Service.example
    type: apply-component
    phase: succeeded
  - id: r847uymujz
    name: adopt-example.config
    type: apply-component
    phase: succeeded

Services:

  - Name: adopt-example.Deployment.example
    Cluster: local  Namespace: default
    Type: k8s-objects
    Healthy
    No trait applied

  - Name: adopt-example.Service.example
    Cluster: local  Namespace: default
    Type: k8s-objects
    Healthy
    No trait applied

  - Name: adopt-example.config
    Cluster: local  Namespace: default
    Type: k8s-objects
    Healthy
    No trait applied
vela status adopt-example -t -d
CLUSTER       NAMESPACE     RESOURCE           STATUS    APPLY_TIME          DETAIL
local     ─── default   ─┬─ ConfigMap/example  updated   2023-01-11 14:15:34 Data: 0  Age: 6m1s
                         ├─ Secret/example     updated   2023-01-11 14:15:52 Type: Opaque  Data: 0  Age: 5m43s
                         ├─ Service/example    updated   2023-01-11 14:12:00 Type: ClusterIP  Cluster-IP: 10.43.65.46  External-IP: <none>  Port(s): 80/TCP  Age: 9m35s
                         └─ Deployment/example updated   2023-01-11 14:11:06 Ready: 1/1  Up-to-date: 1  Available: 1  Age: 10m
The read-only only allows the application to observe resources, but disallow any edits to it. If you want to make modifications you can use the --mode=take-over to use the take-over policy in the adoption application.
Adopt Helm Release
vela adopt also supports directly reading native resources from existing helm release. This is helpful if you previously deployed resources through helm.
- For example, you can firstly deploy a mysql instance through helm.
helm repo add bitnami https://charts.bitnami.com/bitnami
helm repo update
helm install mysql bitnami/mysql
- You can validate the installation through
helm ls.
helm ls
NAME    NAMESPACE       REVISION        UPDATED                                 STATUS          CHART           APP VERSION
mysql   default         1               2023-01-11 14:34:36.653778 +0800 CST    deployed        mysql-9.4.6     8.0.31
- Run
vela adoptcommand to adopt resources from existing release. Similar to native resource adoption, you can get a KubeVela application withread-onlypolicy.
vela adopt mysql --type helm
expected output
apiVersion: core.oam.dev/v1beta1
kind: Application
metadata:
  creationTimestamp: null
  labels:
    app.oam.dev/adopt: helm
  name: mysql
  namespace: default
spec:
  components:
  - name: mysql.StatefulSet.mysql
    properties:
      objects:
      - apiVersion: apps/v1
        kind: StatefulSet
        metadata:
          name: mysql
          namespace: default
        spec:
          podManagementPolicy: ""
          replicas: 1
          selector:
            matchLabels:
              app.kubernetes.io/component: primary
              app.kubernetes.io/instance: mysql
              app.kubernetes.io/name: mysql
          serviceName: mysql
          template:
            metadata:
              annotations:
                checksum/configuration: f8f3ad4a6e3ad93ae6ed28fdb7f7b4ff9585e08fa730e4e5845db5ebe5601e4d
              labels:
                app.kubernetes.io/component: primary
                app.kubernetes.io/instance: mysql
                app.kubernetes.io/managed-by: Helm
                app.kubernetes.io/name: mysql
                helm.sh/chart: mysql-9.4.6
            spec:
              affinity:
                nodeAffinity: null
                podAffinity: null
                podAntiAffinity:
                  preferredDuringSchedulingIgnoredDuringExecution:
                  - podAffinityTerm:
                      labelSelector:
                        matchLabels:
                          app.kubernetes.io/instance: mysql
                          app.kubernetes.io/name: mysql
                      topologyKey: kubernetes.io/hostname
                    weight: 1
              containers:
              - env:
                - name: BITNAMI_DEBUG
                  value: "false"
                - name: MYSQL_ROOT_PASSWORD
                  valueFrom:
                    secretKeyRef:
                      key: mysql-root-password
                      name: mysql
                - name: MYSQL_DATABASE
                  value: my_database
                envFrom: null
                image: docker.io/bitnami/mysql:8.0.31-debian-11-r30
                imagePullPolicy: IfNotPresent
                livenessProbe:
                  exec:
                    command:
                    - /bin/bash
                    - -ec
                    - |
                      password_aux="${MYSQL_ROOT_PASSWORD:-}"
                      if [[ -f "${MYSQL_ROOT_PASSWORD_FILE:-}" ]]; then
                          password_aux=$(cat "$MYSQL_ROOT_PASSWORD_FILE")
                      fi
                      mysqladmin status -uroot -p"${password_aux}"
                  failureThreshold: 3
                  initialDelaySeconds: 5
                  periodSeconds: 10
                  successThreshold: 1
                  timeoutSeconds: 1
                name: mysql
                ports:
                - containerPort: 3306
                  name: mysql
                readinessProbe:
                  exec:
                    command:
                    - /bin/bash
                    - -ec
                    - |
                      password_aux="${MYSQL_ROOT_PASSWORD:-}"
                      if [[ -f "${MYSQL_ROOT_PASSWORD_FILE:-}" ]]; then
                          password_aux=$(cat "$MYSQL_ROOT_PASSWORD_FILE")
                      fi
                      mysqladmin status -uroot -p"${password_aux}"
                  failureThreshold: 3
                  initialDelaySeconds: 5
                  periodSeconds: 10
                  successThreshold: 1
                  timeoutSeconds: 1
                resources:
                  limits: {}
                  requests: {}
                securityContext:
                  runAsNonRoot: true
                  runAsUser: 1001
                startupProbe:
                  exec:
                    command:
                    - /bin/bash
                    - -ec
                    - |
                      password_aux="${MYSQL_ROOT_PASSWORD:-}"
                      if [[ -f "${MYSQL_ROOT_PASSWORD_FILE:-}" ]]; then
                          password_aux=$(cat "$MYSQL_ROOT_PASSWORD_FILE")
                      fi
                      mysqladmin status -uroot -p"${password_aux}"
                  failureThreshold: 10
                  initialDelaySeconds: 15
                  periodSeconds: 10
                  successThreshold: 1
                  timeoutSeconds: 1
                volumeMounts:
                - mountPath: /bitnami/mysql
                  name: data
                - mountPath: /opt/bitnami/mysql/conf/my.cnf
                  name: config
                  subPath: my.cnf
              initContainers: null
              securityContext:
                fsGroup: 1001
              serviceAccountName: mysql
              volumes:
              - configMap:
                  name: mysql
                name: config
          updateStrategy:
            type: RollingUpdate
          volumeClaimTemplates:
          - metadata:
              annotations: null
              labels:
                app.kubernetes.io/component: primary
                app.kubernetes.io/instance: mysql
                app.kubernetes.io/name: mysql
              name: data
            spec:
              accessModes:
              - ReadWriteOnce
              resources:
                requests:
                  storage: 8Gi
    type: k8s-objects
  - name: mysql.Service.mysql
    properties:
      objects:
      - apiVersion: v1
        kind: Service
        metadata:
          name: mysql
          namespace: default
        spec:
          ports:
          - name: mysql
            nodePort: null
            port: 3306
            protocol: TCP
            targetPort: mysql
          selector:
            app.kubernetes.io/component: primary
            app.kubernetes.io/instance: mysql
            app.kubernetes.io/name: mysql
          sessionAffinity: None
          type: ClusterIP
    type: k8s-objects
  - name: mysql.Service.mysql-headless
    properties:
      objects:
      - apiVersion: v1
        kind: Service
        metadata:
          name: mysql-headless
          namespace: default
        spec:
          clusterIP: None
          ports:
          - name: mysql
            port: 3306
            targetPort: mysql
          publishNotReadyAddresses: true
          selector:
            app.kubernetes.io/component: primary
            app.kubernetes.io/instance: mysql
            app.kubernetes.io/name: mysql
          type: ClusterIP
    type: k8s-objects
  - name: mysql.config
    properties:
      objects:
      - apiVersion: v1
        kind: Secret
        metadata:
          name: mysql
          namespace: default
      - apiVersion: v1
        kind: ConfigMap
        metadata:
          name: mysql
          namespace: default
    type: k8s-objects
  - name: mysql.sa
    properties:
      objects:
      - apiVersion: v1
        kind: Secret
        metadata:
          name: mysql
          namespace: default
      - apiVersion: v1
        kind: ConfigMap
        metadata:
          name: mysql
          namespace: default
    type: k8s-objects
  policies:
  - name: read-only
    properties:
      rules:
      - selector:
          componentNames:
          - mysql.StatefulSet.mysql
          - mysql.Service.mysql
          - mysql.Service.mysql-headless
          - mysql.config
          - mysql.sa
    type: read-only
status: {}
- You can similarly use
--applyparameter to apply the application into cluster and use--mode=take-overto allow modifications by enforcingtake-overpolicy. In addition to that, if you want to completely adopt resources in helm chart into KubeVela application and disable the management of that helm chart (prevent multiple sources), you can add--recycleflag to remove the helm release secret after the application has entered running status.
vela adopt mysql --type helm --mode take-over --apply --recycle
resources adopted in app default/mysql
successfully clean up old helm release
- You can check the application status using
vela statusandvela status -t -d.
vela status mysql
expected output
About:

  Name:         mysql
  Namespace:    default
  Created at:   2023-01-11 14:40:16 +0800 CST
  Status:       running

Workflow:

  mode: DAG-DAG
  finished: true
  Suspend: false
  Terminated: false
  Steps
  - id: orq8dnqbyv
    name: mysql.StatefulSet.mysql
    type: apply-component
    phase: succeeded
  - id: k5kwoc49jv
    name: mysql.Service.mysql-headless
    type: apply-component
    phase: succeeded
  - id: p5qe1drkoh
    name: mysql.Service.mysql
    type: apply-component
    phase: succeeded
  - id: odicbhtf9a
    name: mysql.config
    type: apply-component
    phase: succeeded
  - id: o36adyqqal
    name: mysql.sa
    type: apply-component
    phase: succeeded

Services:

  - Name: mysql.StatefulSet.mysql
    Cluster: local  Namespace: default
    Type: k8s-objects
    Healthy
    No trait applied

  - Name: mysql.Service.mysql-headless
    Cluster: local  Namespace: default
    Type: k8s-objects
    Healthy
    No trait applied

  - Name: mysql.Service.mysql
    Cluster: local  Namespace: default
    Type: k8s-objects
    Healthy
    No trait applied

  - Name: mysql.config
    Cluster: local  Namespace: default
    Type: k8s-objects
    Healthy
    No trait applied

  - Name: mysql.sa
    Cluster: local  Namespace: default
    Type: k8s-objects
    Healthy
    No trait applied
vela status mysql -t -d
CLUSTER       NAMESPACE     RESOURCE               STATUS    APPLY_TIME          DETAIL
local     ─── default   ─┬─ ConfigMap/mysql        updated   2023-01-11 14:40:16 Data: 1  Age: 7m41s
                         ├─ Secret/mysql           updated   2023-01-11 14:40:16 Type: Opaque  Data: 2  Age: 7m41s
                         ├─ Service/mysql          updated   2023-01-11 14:40:16 Type: ClusterIP  Cluster-IP: 10.43.154.7  External-IP: <none>  Port(s): 3306/TCP  Age: 7m41s
                         ├─ Service/mysql-headless updated   2023-01-11 14:40:16 Type: ClusterIP  Cluster-IP: None  External-IP: <none>  Port(s): 3306/TCP  Age: 7m41s
                         └─ StatefulSet/mysql      updated   2023-01-11 14:40:16 Ready: 1/1  Age: 7m41s
- If you run
helm lsyou will not be able to find the original mysql helm release since the records have been recycled.
helm ls
NAME NAMESPACE REVISION UPDATED STATUS CHART APP VERSION
There are multiple ways to use KubeVela together with Helm.
If you want to use Helm to control the release process of charts and use KubeVela to monitor those resources, you can use the default mode (read-only) and do not recycle the helm release secret. In this case, you will be able to monitor resources dispatched by Helm Chart with KubeVela tools or eco-system (like viewing on Grafana).
If you want to migrate existing resources from Helm Chart to KubeVela application, you can use the take-over mode and use the --apply flag to recycle helm release records.
Customized Adoption
By default, vela adopt will take resources from given source (native resource list or helm chart) and group them into different components. For resources like Deployments or Statefulsets, the original spec will be reserved. For other resources like ConfigMap or Secret, the data will not be recorded in the adoption application (which means the application does not care for the content in them). For special resources (CustomResourceDefinition), the garbage-collect and apply-once policy will be additionally attached in the application.
The conversion from resources into application is achieved by using the CUE template. You can refer to GitHub to see the default template.
You can also build your own adoption rule using CUE and add --adopt-template to vela adopt command.
- For example, let's create an example deployment.
kubectl create deploy custom-adopt --image=nginx
- Create a file named
my-adopt-rule.cue.
import "list"

#Resource: {
    apiVersion: string
    kind:       string
    metadata: {
        name:       string
        namespace?: string
        ...
    }
    ...
}

#Component: {
    type: string
    name: string
    properties: {...}
    dependsOn?: [...string]
    traits?: [...#Trait]
}

#Trait: {
    type: string
    properties: {...}
}

#Policy: {
    type: string
    name: string
    properties?: {...}
}

#Application: {
    apiVersion: "core.oam.dev/v1beta1"
    kind:       "Application"
    metadata: {
        name:       string
        namespace?: string
        labels?: [string]:      string
        annotations?: [string]: string
    }
    spec: {
        components: [...#Component]
        policies?: [...#Policy]
        workflow?: {...}
    }
}

#AdoptOptions: {
    mode:         *"read-only" | "take-over"
    type:         *"helm" | string
    appName:      string
    appNamespace: string
    resources: [...#Resource]
    ...
}

#Adopt: {
    $args:    #AdoptOptions
    $returns: #Application

    // adopt logics

    $returns: #Application & {
        metadata: {
            name:      $args.appName
            labels: "app.oam.dev/adopt": $args.type
        }
        spec: components: [for r in $args.resources if r.kind == "Deployment" {
            type: "webservice"
            name: r.metadata.name
            properties: image: r.spec.template.spec.containers[0].image
            traits: [{
                type: "scaler"
                properties: replicas: r.spec.replicas
            }]
        }]
        spec: policies: [
            {
                type: $args.mode
                name: $args.mode
                properties: rules: [{
                    selector: componentNames: [ for comp in spec.components {comp.name}]
                }]
            }]
    }
}
This customized adoption rule will automatically recognize deployment resources and convert it into KubeVela application's webservice component. It can intelligently detect the replicas number of the given deployment and attach a scaler trait to the component.
- Run
vela adopt deployment/custom-adopt --adopt-template=my-adopt-rule.cue. You can see the converted application as
apiVersion: core.oam.dev/v1beta1
kind: Application
metadata:
  creationTimestamp: null
  labels:
    app.oam.dev/adopt: native
  name: custom-adopt
spec:
  components:
  - name: custom-adopt
    properties:
      image: nginx
    traits:
    - properties:
        replicas: 1
      type: scaler
    type: webservice
  policies:
  - name: read-only
    properties:
      rules:
      - selector:
          componentNames:
          - custom-adopt
    type: read-only
status: {}
With this capability, you can make your own rules for building application from existing resources or helm charts.
Adopt All Resources
Adopt All Native Resources
If you want to adopt all resources in a namespace, you can use --all flag.
vela adopt --all
By default, it will adopt all Deployment/StatefulSet/DaemonSet resources in the namespace. You can also specify a Custom Resource to adopt.
vela adopt mycrd --all
This command will first try to list all specified resources in the namespace, and find the related resources (like ConfigMap, Secret, Service, etc.) with resource topology rule and adopt them together.
The resource topology rule is written in CUE template, the default template is in GitHub. With this default rule, the related resources(ConfigMap, Secret, Service, Ingress) will be adopted together with the Deployment/StatefulSet/DaemonSet.
For example, if you have following resources in the cluster:
Resources(Deployment, ConfigMap, Service, Ingress)
With vela adopt --all, these resources will be adopted as an Application like below:
Adopted Application
You can also build your own resource topology rule to find custom resource relations using CUE and add --resource-topology-rule to vela adopt command.
vela adopt --all --resource-topology-rule=my-rule.cue
After adopting all resources and applying them to the cluster, you can checkout all the adopted applications with vela ls or in the dashboard.
Adopt All Helm Releases
If you want to adopt all helm releases in a namespace, you can use --all flag with --type=helm.
vela adopt --all --type helm
That's all about the adoption feature. We hope that KubeVela can help you deliver your applications with ease and confidence.